
- Folder Structure.
- Creating the folder structure through eclipse.
- Creating Package and Java file.
- Create Build.xml file
- Create Testing.xml file.
- Set Build.Properties value
- Run the Test Suite.
- How it works?
The folder structure or contents of this framework is as follows:
|----------SeleniumTestFramework
|-------config
|-------lib
|-------test-src
|-------build.xml
|-------config.properties
|-------test-output
|-------build
- The config directory contains testng.xml file, and is a place holder for configuration files.
- The lib directory contains required jar files, and is a place holder for other library jars/zips.
- The test directory contains test java files and is a place holder for other test files. Once the tests are run, build and test-output directories will be created.Test-output directory contains result files, and is generated by TestNG.
- The build.properties is properties file.
- The build.xml file is taking care of starting selenium server, compiling testcases and running the testsuite.
- The build directory contains compiled classes, and is a volatile directory that is deleted by the target clean in build.xml file.
1. Create a Java Project by name “SeleniumTestFramework” (Ex: New>Java Project)

2. Rename the src folder to “test-src”. This folder will contain all the java source file and packages.
3. Create a folder “config” (it contains all the configuration for your each test case) and “lib” (Copy all the jar file mentioned below to this folder)

4. Create a “Build.xml” file in base directory of the project. (Which is basically ANT file)
5. Create a “build.properties” file in base directory of the project. (Which contains the global variable declaration required for the test.
6. Create “testing.xml” file under “config” folder.(Which is basically a TestNG file).

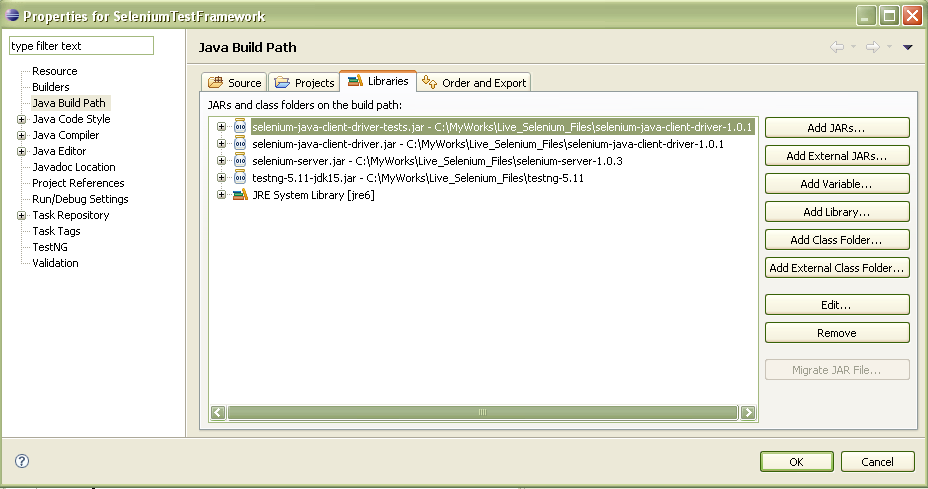
7. Right Click on Project “SeleniumTestFramework” and select “Build Path>Configure Build Path”.Add jar file to the project as specified in below snapshot.
3. Creating Package and Java file.
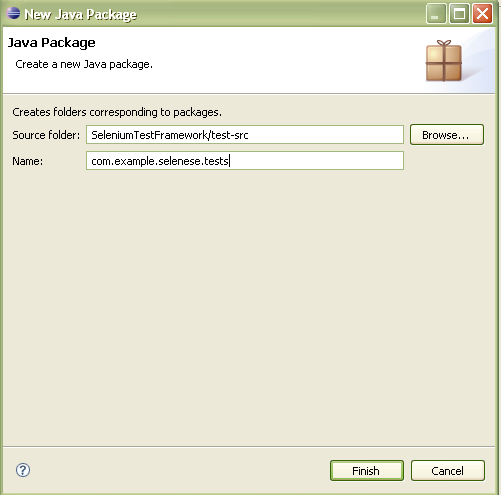
1. Right Click on “Test-src” folder and select “New>Package”
2. Create a package by name “com.example.selenese.tests” as shown below:
3. Create a java file: Right click on Package created above and select “New>Class”.
4. Create a class by name “Demo” as shown below:

5. Replace the content of Demo.java with below content.

4. Create Build.xml file
• Replace the content of build.xml file with below content

NOTE: For more info please visit http://ant.apache.org/manual/using.html
5. Create Testing.xml file.
• Replace the content of testing.xml file with below content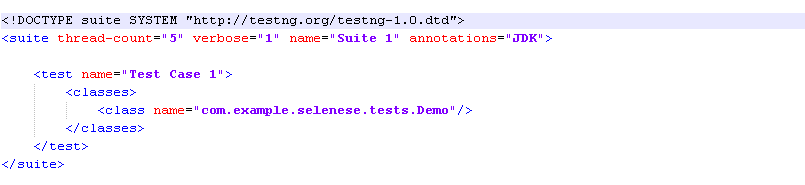
NOTE: For more info please visit http://testng.org/doc/documentation-main.html#testng-xml
6. Set Build.Properties value

7. Run the test suite.
• Run the Project using ANT. OR Select Build.xml and Run this file using ANT Build• Eclipse will take care of starting selenium server and running each test case mentioned in testing.xml.
• The Report will be generated in Project Base directory with name “test-output” as shown below.

8. How it works?
As a test suite starts in your favorite language, the following happens:- The client/driver establishes a connection with the selenium-server.
- Selenium-Server launches a browser (or reuses an old one) with a URL that will load Selenium core web page.
- Selenium-Core gets the first instruction from the client/driver (via the HTTP Proxy built into the Selenium-RC Server).
- Selenim-Core acts on that first instruction, typically opening a page of the AUT.
- The web server is asked for that page, and it renders in the frame/window reserved for it.
Hi Chidambaram,
ReplyDeleteNice article on selenium.
Can you please updated Selenium Framework content asap?
Thanks
Senthil Kumar
Hi Senthil,
ReplyDeleteThanks for your comment.I have updated the selenium framework content.
Thanks
S Chidambaram
Hi Chidambram ... It serves well for those who dives straight into Selenium as their first automation tool ... but when some one is trying to move from say JUnit to Selenium ... am sure he gets a bump ... can you please compare and give the differences. Thanks in advance.
ReplyDeleteJeremy
Hi
ReplyDeleteYour work is good..can you post how to run selenium junit scripts using grid...
Thanks,
naga
HI,
ReplyDeleteSuch a Nice article ..usefull information..
Thanks,
Sandhya
Very nice article.. very good information.. plese post more information on selenium
ReplyDeleteThanks for your informative article on selenium automation testing tool. This open source platform helps tester to validate the web application/system performance and behavior.
ReplyDeletehighly comprehensive article. Check our in house iSAFE framework - Selenium Automation Testing Framework which reduces the dependency level with respective to human interventions by automating the testing process.
ReplyDeleteGood and Interesting, thanks for sharing your valuable ideas and information... it is more useful for me to learn selenium as a fresher it gives more sounds to learn...
ReplyDeleteSoftware Testing Training in chennai